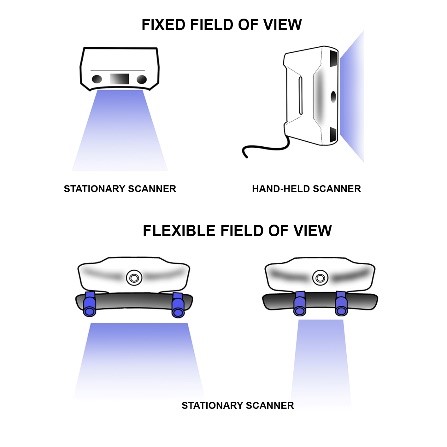
Field of view is the area that a 3D scanner can “observe” and digitize into a 3D scan. Another term for FOV is scanning volume.
In order to get the best scanning result, you should use a 3D scanner with the correct field of view. Think of this as an ordinary camera and a lens focus. When the object is placed right in the focus, the result is fine: an image is sharp and looks beautiful. But once you place an object a little bit too far away or closer to the camera, the whole image will become blurry. If the object is out of focus, it will be undistinguishable.
The same principle works for 3D scanners. Only just here we don’t have a focus, but we have a field of view, because we operate in three dimensions instead of two.
There are 3D scanners with a fixed and flexible FOV. Fixed FOV means that you can scan objects of only certain size. Flexible field of view enables the user to scan a variety of object sizes: from small to quite large. Stationary scanners can change the field of view by moving the camera along the rail. The closer the cameras are to each other, the smaller FOV the user gets. The wider apart the cameras are set the larger objects one can digitize due to a bigger FOV.

Both types of scanners have their pros and cons. For example, with a flexible FOV you can scan a variety of objects, but then again…how often do you scan that many objects of different sizes? Most of 3D scanners’ owners scan typical objects of about same sizes.
Scanners with flexible field of view need to be calibrated every time you change the scanning volume, while 3D scanners with fixed FOV require calibration rarely. The price difference also plays a big part: fixed FOV scanners are more affordable, then flexible ones.
Additionally, 3D scanners with a fixed scanning volume are more portable (since most of them are hand-held), which enables you to scan challenging objects even in the most hard-to-reach places.
What happens if you mismatch the scanner’s FOV and the object size?
Remember an analogy in the beginning of the article about a regular optical camera? When photographers need to take a shot of something miniature, they use special macro lenses.
Similar physics work for 3D scanners, too. If you take a 3D scanner with a large field of view and try to scan something small with lots of intricate details, your 3D scan will lack much of the details and accuracy. A 3D model will look “blurry”.
If you take a 3D scanner that was made for scanning small objects and try to scan a large one, you would need to make more scans in order to get a full model, which is rather time-consuming. Moreover, such 3D scan would turn out large in file size and you’d require lots of computing power to process gigabytes of information. That’s not the most effective way to work with a 3D scanner…
What objects Calibry 3D scanner is suited for?
Calibry scanners come in two models: the initial Calibry 3D scanner and Calibry mini.
Minimal FOV of Calibry 3D scanner is 280 x 360 mm and the maximum one 490 x 650 mm, which is enough to digitize objects from 30cm to 10m in length. Working in this range, you’ll get fine hi-res 3D models at an adequate file weight.
Calibry mini is suited for miniature objects. With FOV ranging from 86x115 mm to 144x192 mm maximum, it’s great for scanning objects from 2 cm to 30 cm in length.
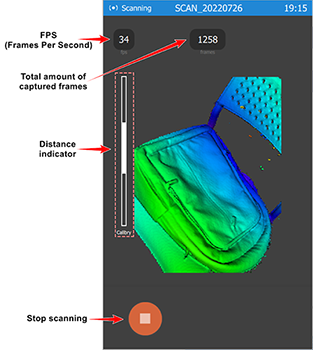
During scanning there is no need to worry if you keep up with the required scanning volume, as the built-in touchscreen indicates by color the right distance till the object. Blue means the scanner is a bit far away, but still gets the data. Red indicates that an object is too close, but still withing the field of view. It’s a warning to shift into the optimal zone, the green one.

