Markers

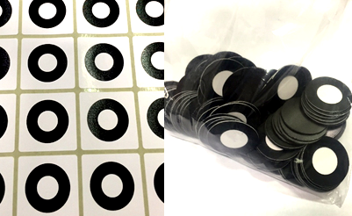
A marker is a reference point in the form of a white circle inscribed in a black one. Without markers, the device might lose its alignment during scanning and the software will not know how Frame1 is supposed to be aligned to Frame2, Frame2 to Frame3 and so on… The software will try to align all frames using the objects’ unique geometry. It has sophisticated algorithms which will understand that a human nose in Frame1, should be aligned to the same human nose in Frame2 and not to some other body part.
However, this guesswork doesn’t always produce great results and in many cases, especially on objects with large flat surfaces and no unique geometry, even the most sophisticated algorithm will fail. Attaching markers to the object and giving the software a “constant feature” to track ensures the highest accuracy. It also ensures repeatability and that a geometrical error will not accumulate over a long distance.
Imagine scanning a long pipe. It is 10 meters long and 1 meter in diameter. If you don’t use markers, over some distance, the scan of the pipe will appear to bend slightly. That is because optical scanners accumulate an error over distance. Markers solve this issue and provide you with the most accurate results.
Here are a few tips for scanning with Thor3D scanners and markers:
-
At any given time during scanning, the scanner needs to see a minimum of 3 markers in every frame. When it doesn’t, scanning will automatically stop.
- Although 3 markers per frame is the minimum, the optimal number is 5. That is because in certain circumstances, even if the marker is visible to the camera, the software doesn’t recognize it as such. This could be due to glare, for example.
- When affixing markers, apply them on flat areas of the object and not on sharp edges of the object. Also, remember, that the scanner might sometimes not see a marker when looking at it from an awkward angle. This means that when scanning around a large corner (like from the bumper of the car to the back door), try affixing more markers in the field of view.
- Whether scanning with or without markers, the center of the frame of any optical device will produce better results than the edges of the frame. If you want a great scan of the entire object, make sure to scan each portion of that object with the center of the frame.
- Thor3D scanners show, in real time, how many markers are in the field of view. If you are not sure about whether you’ve affixed enough markers on the object, turn on the scanner in preview mode and walk around the object. You will see how many markers the scanner sees at all times and if it’s less than 3, you’ll know where more markers are needed.
You can download the markers for Calibry and Drake 3D scanners in the Download Center and print them on the printer.
A set of magnetic markers comes with Calibry 3D scanner, but you can purchase an additional set from us at the price of 50 USD/45 EUR excluding shipping. Each set contains 150 magnetic markers. Contact your nearest THOR3D distributor or write to info@thor3dscanner.com for the purchase.
